I use a homegrown router to perform routing in my React Single Page Applications, because React-Router keeps getting in my way. In this article, I'll explain how the application is structured, where data load API calls are made, and how to render a component on the page.
In a previous post, I've underlined a few reasons why I dislike using React-Router, and would prefer to avoid it in favor of my own homegrown router. You might want to read it for a bit of background.
I have been using a small library I wrote a few years ago to do the client-side routing for pretty much all of the single page applications, I've written where another routing solution was not already in use. So far, this library was just called router.js, and in preparation for this post, I've extracted the file, cleaned it up and open-sourced it as BlueJacket. You can find it on Github and on NPM.
I prefer structuring my applications in the MVC pattern, with clear boundaries of seperation between the Views and the Controllers. Generally in a React application, the Model just ends up being my React store, and the associated Action Creators and Reducers. Since we are focusing on routing in this article, I'm going to be skipping Redux usage.
So let's get started!
Routing with BlueJacket
In order to demonstrate how I setup routing with BlueJacket, I'm going to write a simple Twitter clone. Let's call it Twitter-Clone, because my creativity has completely failed me, and I've already spent five minutes trying to think up a witty name. So in Twitter-Clone, there are only two views:
- Tweet Stream Page: This page shows a list of tweets in reverse chronological order, from the people you follow. This will use the url
/tweets. - Tweet Page: This page shows the contents of a single tweet, and the replies to that tweet in the form of a conversation. This will use the url
/tweet/:tweetId.
Scaffolding
Let's generate our applications scaffolding first. We're going to be using Create-React-App to do this. It's simple, easy to use, and most importantly, keeps me from having to deal with Webpack by myself 😅
To create the scaffolding using Create-React-App, run this one liner:
yarn create react-app twitter-clone
Not using yarn? Read this to find out how to generate the scaffolding for your application.
Now let's check the the scaffolding is working as expected.
cd twitter-clone
yarn run start
This should open up your browser and open the default create-react-app app.js page. If you see a spinning React icon like below, it works.
Please Note: The code for this example app is on Github as 'BlueJacket Twitter Clone'.
Okay, so now that our scaffolding has been generated successfully, let's go ahead and restructure it a bit. First off, delete everything inside the /src directory. Then create a new file, /src/index.js. This will be the entry point to our application.
This is what goes into /src/index.js:
/**
 * Twitter-Clone SPA Entry Point
 */

import BlueJacket from 'bluejacket';

import routes from './routes';

const router = new BlueJacket('twitter-clone');

function setupRoutes() {
    routes.forEach(setupRoute => setupRoute(router));
};

function init() {
    setupRoutes();
    router.resolve(window.location.href);
};
Oh, and let's also install BlueJacket before we forget about it:
yarn add bluejacket
Now, if you check out the terminal you're running the app in, you'll see the following error message:
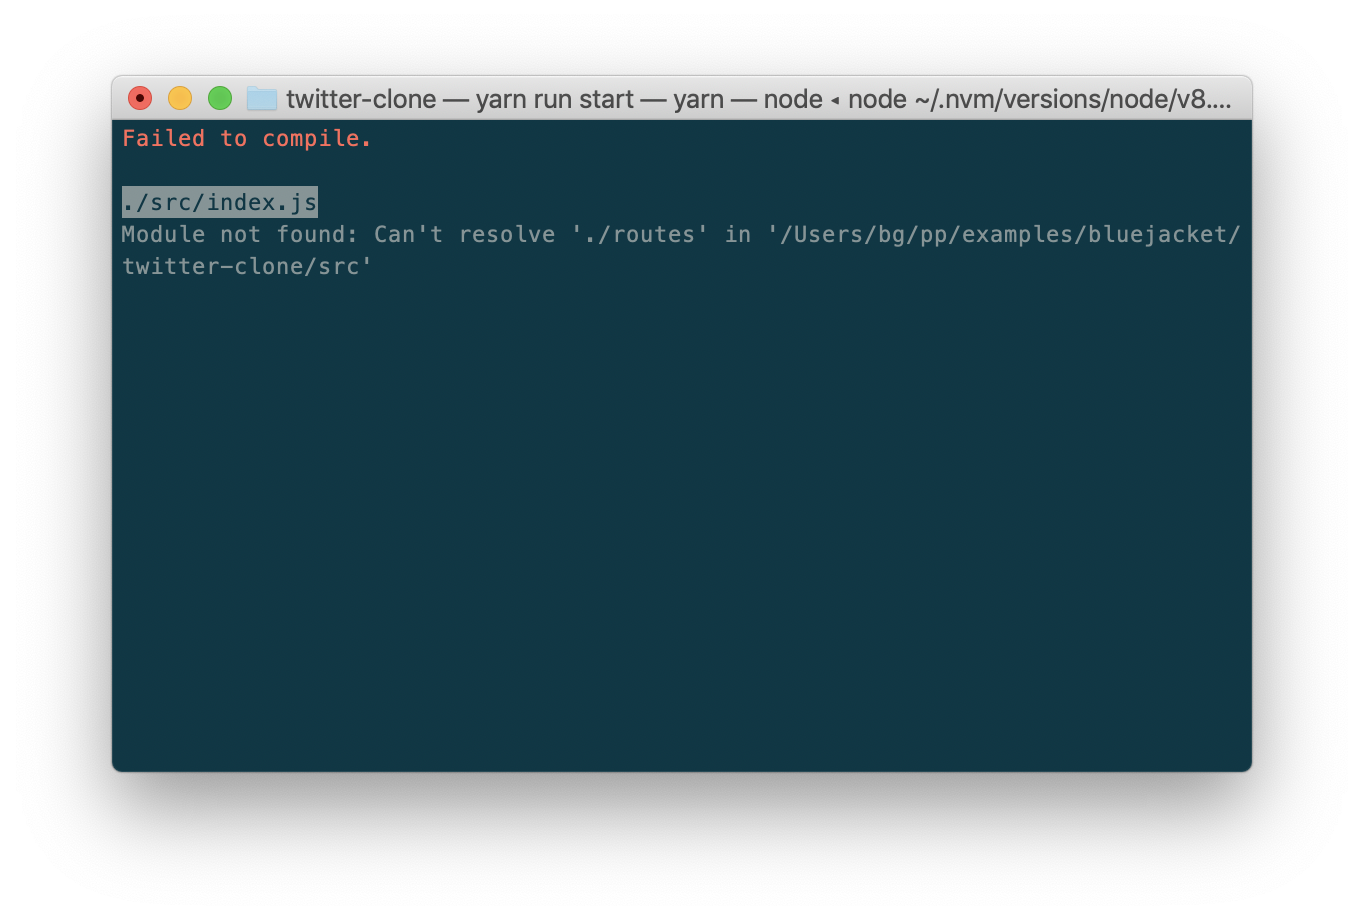
Let's fix that. Create a new directory /src/routes, and a new file /src/routes/index.js. This will export an array of setup functions. Each setup function will accept the router instance as it's single parameter, and will define path handlers on that router.
This is what goes into /src/routes/index.js:
/**
 * Route definitions for Twitter-Clone
 */

module.exports = [];
Now, the error should be cleared up and if you check your browser, it would have auto-reloaded to show you, a nice big empty white page. Of course an empty page is of no use to us, so let's start rendering things.
Let's start with the Stream page. The stream page is our default view and should be rendered when /tweet route is requested. The stream page will be rendered using the StreamList component. So let's create that first.
Create a new file /src/views/tweetList/index.js with the content:
/**
 * StreamListView Component
 *
 * Renders a list of stream items
 */

import React from 'react';

import Tweet from '../Tweet';
import './index.css';

class StreamList extends React.Component {
    static get defaultProps() {
        return {
            tweets: []
        };
    }
    render() {
        const tweetItems = this.props.tweets.map(tweet => <Tweet key={tweet.id} {...tweet} />);

        const component = (
            <div
                className="stream container">
                <h4>Your Tweet Stream</h4>
                <div
                    className="items">
                    {tweetItems}
                </div>
            </div>
        );

        return component;
    }
};

export default StreamList;
And a corresponding style file /src/views/tweetList/index.css, so we can make the app somewhat decent looking:
.stream.container {
    padding: 2rem;
}
Since we are going to be displaying tweets in multiple pages, we'll make that it's own component. Create /src/views/Tweet/index.js:
/**
 * Tweet Component
 */

import React from 'react';

import './index.css';

class Tweet extends React.Component {
    static get defaultProps() {
        return {
            user: {},
            content: ''
        };
    }
    render() {
        const component = (
            <div
                className="tweet">
                <div
                    className="author">
                    {this.props.user.name}
                </div>
                <div
                    className="content">
                    {this.props.content}
                </div>
            </div>
        );

        return component;
    }
};

export default Tweet;
And it's corresponding style file at /src/views/Tweet/index.css:
.tweet {
    padding: 1rem;
}

.tweet .author {
    font-style: oblique;
    padding: 0.5rem 0;
}
There now we've got all the React components necessary to render our stream page. These are fairly straight forward React components which expect the property tweets – an array of objects – and display them in a list.
The next step is to create a controller, and register it as the route handler for /tweets. Remember that empty [] we exported as routes? Yeah let's go back to that. Open up /src/routes/index.js, and modify it to:
/**
 * Route definitions for Twitter-Clone
 */

import { default as stream } from './stream'

export default [
    stream
];
As you can see, we are importing the default export from stream.js. And since that doesn't exist yet, we'll have to create it. Create a new file /src/routes/stream.js with the content:
/**
 * Stream related routes
 */

import React from 'react';

import StreamListView from '../views/tweetList';

/**
 * Retrieves top 20 items from '/api/v1/:user/tweet'
 * And renders them here
 *
 * We'll assume that the user is always logged in and
 * their user id is always 'lestrade'.
 */
async function list(context) {
    const userId = 'lestrade';

    const response = await fetch(`http://localhost:4000/api/v1/${userId}/stream`);
    const streamItems = (await response.json()).data;

    function renderComponent(props) {
        context.addComponent(<StreamListView key="stream-list" {...props} />);
        context.render();
    };

    return renderComponent({
        tweets: streamItems
    });
};

function setup(router) {
    router.handle('/tweets', list);
};

export default setup;
Here we are exporting the function setup, which is what is called in our /src/index.js. It is called with the router as a parameter, and we use that to register the list method as a route handler for the /tweets route.
In the list method, we are making an API call, and formatting the response of the API call to pass along to our Stream View.
I've not actually built out the API, and am instead mocking it using Mocktastic, which is a downloadable desktop app that allows you to easily create dynamic API responses. If you're a frontend developer stuck blocked for an API to become available before you can work on it, then this is probably something you'll find helpful, so check it out.
Now back to our list method. When you run this code you'll find that addComponent and render are both undefined. This is because they are mixins that we provide to the BlueJacket router, which we haven't actually configured yet. So create a file /src/mixins.js with the following content:
/**
 * Router mixins for Twitter-Clone
 */

import React from 'react';
import ReactDOM from 'react-dom';

function addComponent(component, key) {
    this.childList = this.childList || [];

    // If a key is not explicitly specified,
    // use the key prop of the React component
    key = key || component.key;

    if (!key)
        throw new Error('key is mandatory for adding a child component');

    let viewComponentExistsInChildList = false;

    this.childList.some((child, i) => {
        const childKeyMatchesThisKey = child.key && child.key === key;

        if (childKeyMatchesThisKey) {
            viewComponentExistsInChildList = true;
            this.childList[i] = component;
        }

        return viewComponentExistsInChildList;
    });

    if (!viewComponentExistsInChildList)
        this.childList.push(component);

    // To allow for chaining return the context
    return this;
};

function removeComponent(component, key) {
    this.childList = this.childList || [];

    // If a key is not explicitly specified,
    // use the key prop of the React component
    key = key || component.key;

    if (!key)
        throw new Error('key is mandatory for removing a child component');

    let indexOfChildWithMatchingKey = -1;

    for (let i = 0; i < this.childList.length; ++i) {
        const child = this.childList[i];
        const childKeyMatchesThisKey = child.key && child.key === key;

        if (childKeyMatchesThisKey) {
            indexOfChildWithMatchingKey = i;
            break;
        }
    }

    if (indexOfChildWithMatchingKey > -1)
        this.childList.splice(indexOfChildWithMatchingKey, 1);

    // To allow for chaining return the context
    return this;
};

function render() {
    this.childList = this.childList || [];

    let component = (<div className="root-container">{this.childList}</div>);

    ReactDOM.render(component, document.getElementById('root'), () => {
        // Scroll back to top, once rendering is complete
        document.body.scrollTop = document.documentElement.scrollTop = 0;
    });

    // To allow for chaining return the context
    return this;
};

export default {
    addComponent,
    removeComponent,
    render
};
This file exports three methods:
addComponent: This method will accept a React component, and an optional key parameter and use either the providedkeyparameter or thekeyproperty of the React component, to add or replace the component in achildListproperty onthis. Inside any mixinthiswill always refer to the context object.removeComponent: This method will accept a React component, and an optional key parameter and use either the providedkeyparameter or thekeyproperty of the React component, to remove the component with the matching key from thechildListproperty onthis. Inside any mixinthiswill always refer to the context object.render: This method performs the actual rendering. It renders adivwith all the components inthis.childListas it's children. Once the render has completed, it scrolls the page to the top, for convienience.
Now, we should be able to run the application and actually get rendered output.
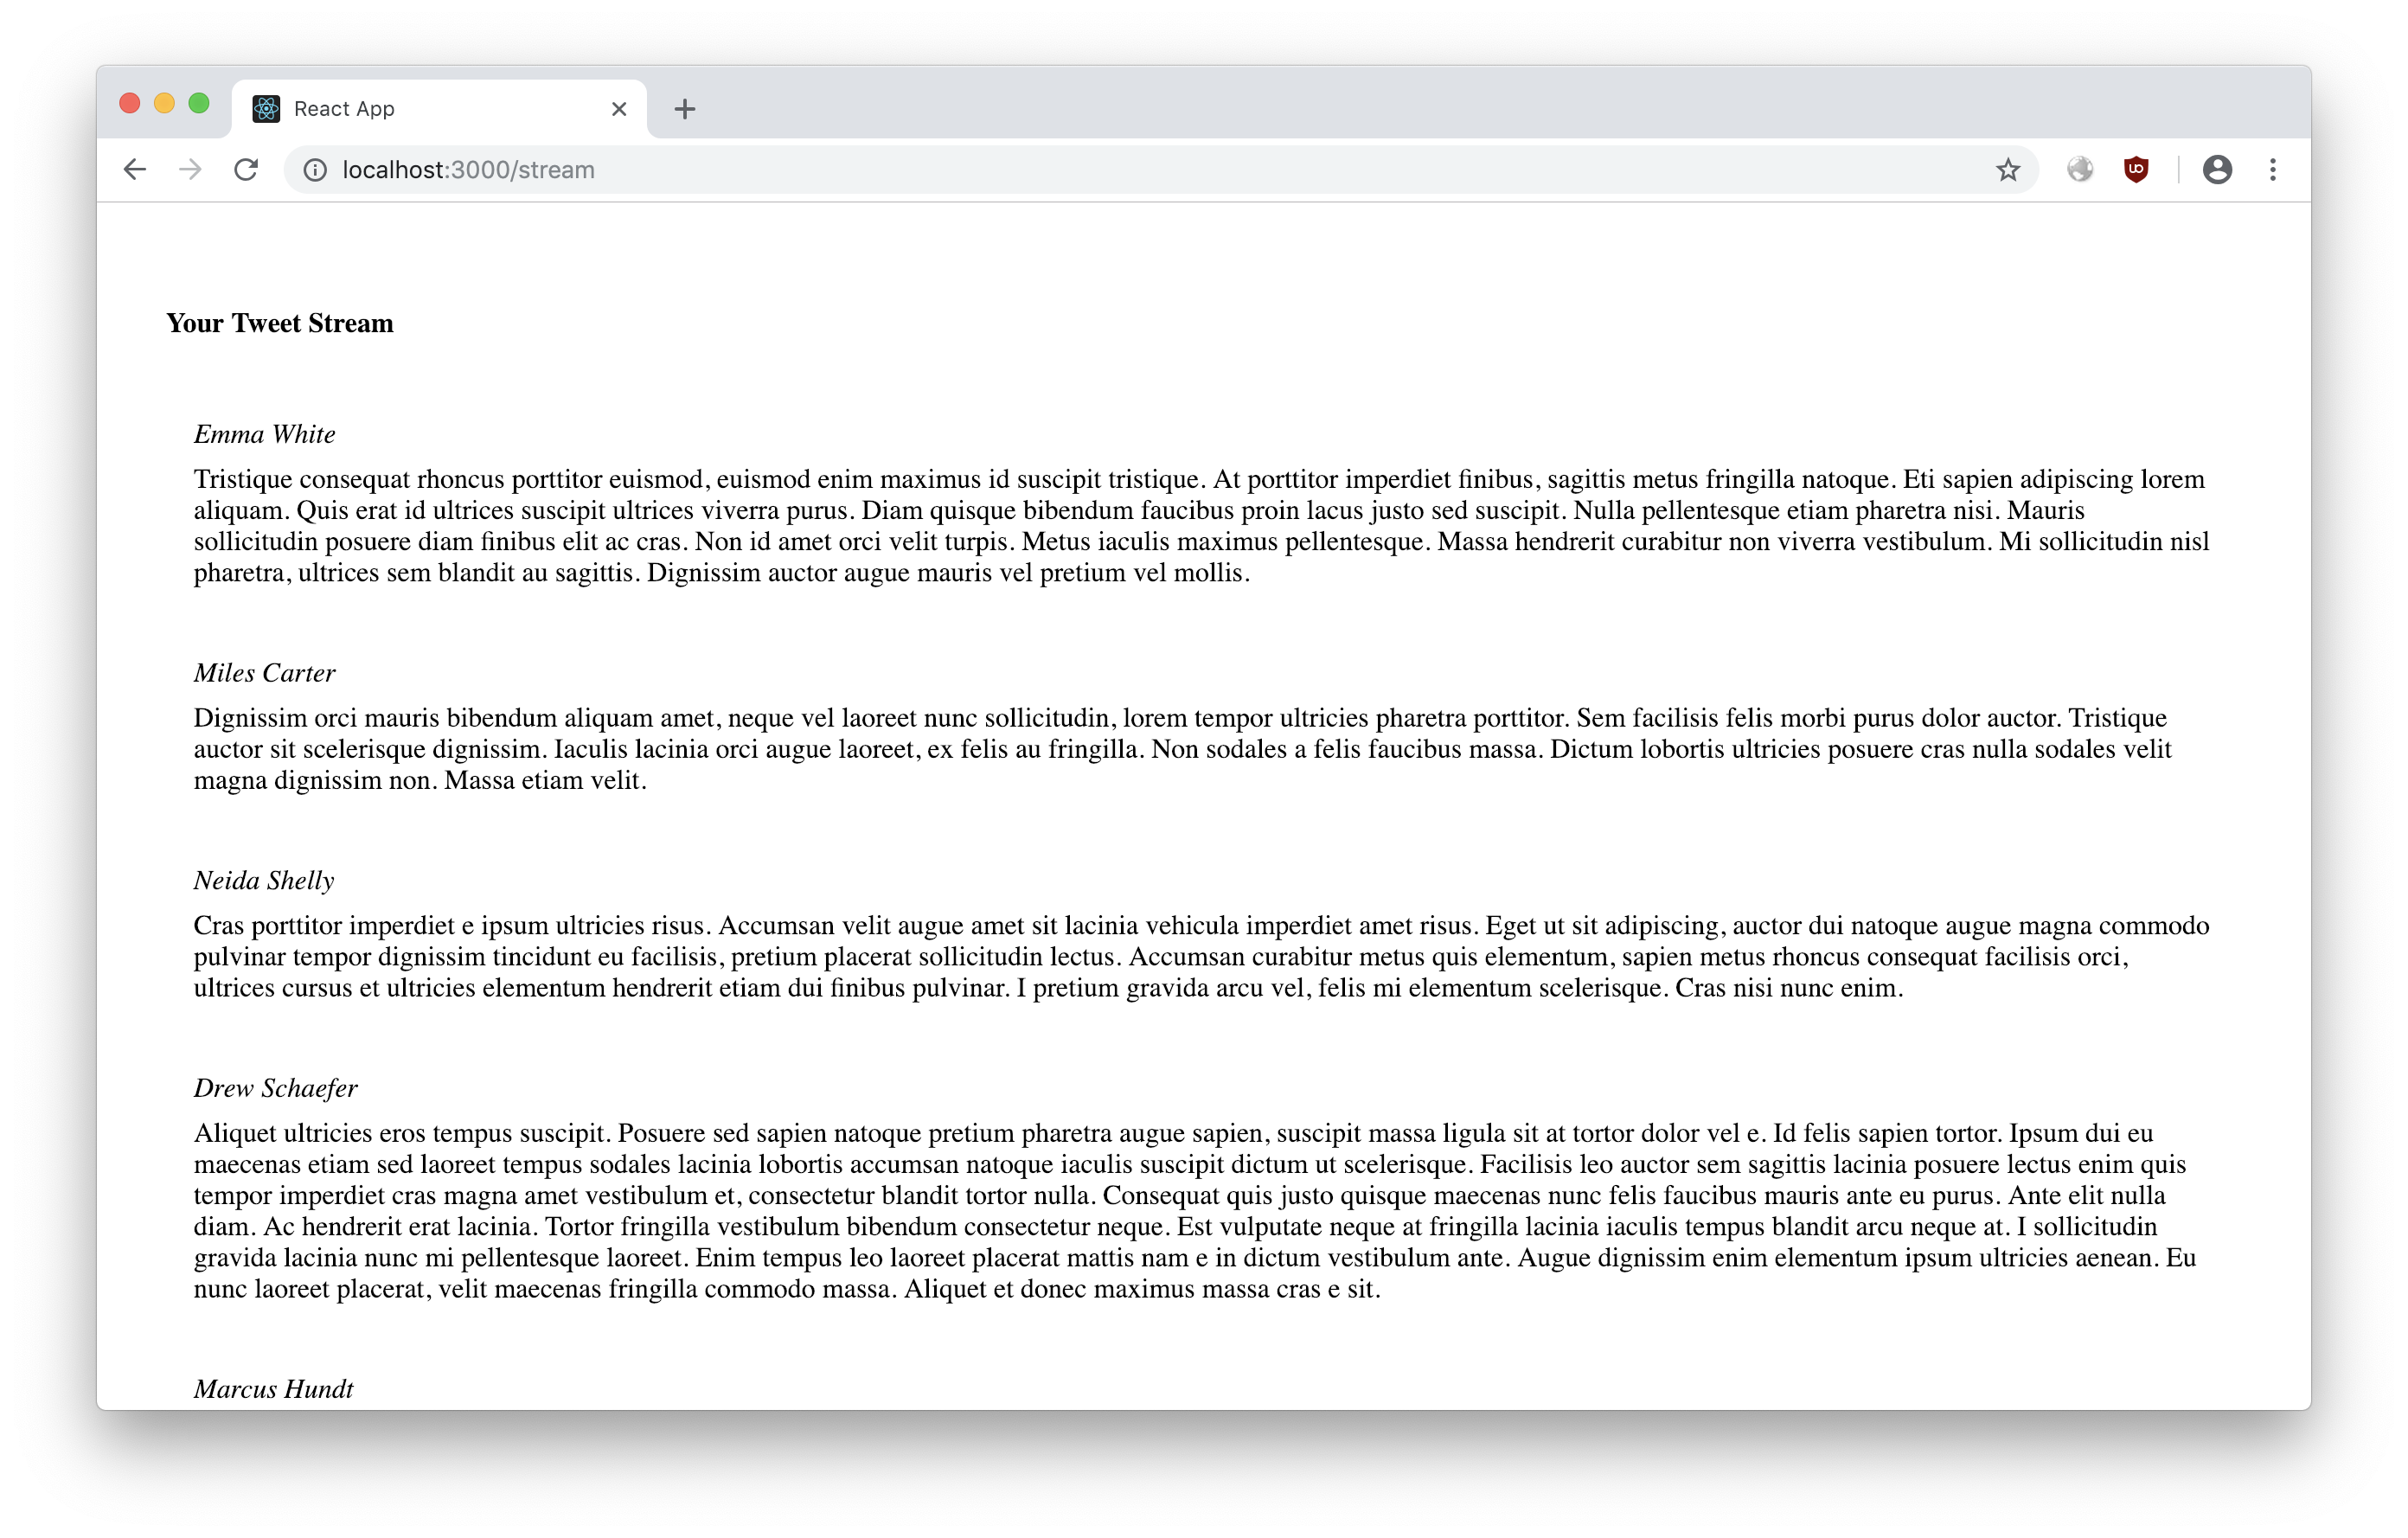
Surprised I put in so much effort, to mock out the API response in the screenshot? It took me only a couple of minutes, and the returned response changes dynamically with every request I make to the API. All the data is faked, and generated dynamically on the fly when I make a request. To do this easily, without having to put in too much time and effort, I use Mocktastic. It's a REST API mocking tool, with team collaboration support! You should check it out.
Wow, that ended up being a pretty long article, and I've not even covered half of the topics. So let's take a break for now, and continue this in the next article in this series, in a few days. Thank you for reading so far, and do let me know what you think. Write to me at asleepysamurai at google's mail service.